Local Development Environment
This guide walks you through setting up and using the polymesh-dev-env Docker Compose environment for local Polymesh development.
1. Introduction
This environment provides a self-contained Polymesh ecosystem running locally using Docker. It runs in one of two modes:
Default mode starts the core Polymesh stack:
- A Polymesh blockchain node running in development mode.
- Indexing services (SubQuery indexer plus a GraphQL server) for efficient data retrieval.
- Two instances of the Polymesh REST API — one using local keys, one using HashiCorp Vault.
- HashiCorp Vault for secure key management.
- Automated setup scripts for Vault initialisation and test account/identity creation.
EVM tooling mode (--profile evm) adds, on top of the above:
eth-rpc— an Ethereum JSON-RPC proxy in front of the node, so standard Ethereum tooling (MetaMask, Foundry, Hardhat, ethers.js, viem) can talk to Polymesh'spallet-revivecontracts.- A Blockscout block explorer (backend API plus web frontend) with its own dedicated PostgreSQL and Redis services.
It's designed for developers who want to build applications, test smart contracts, or experiment with Polymesh features without needing to connect to public testnets or mainnet.
2. Prerequisites
- Docker Desktop or Docker Engine + Compose V2: Ensure Docker is installed, running, and accessible from your terminal. You can verify with
docker ps. Download instructions: https://docs.docker.com/get-docker/ - Resources: An idle default stack uses roughly 2.5 GB of RAM and around 2 GB of images. Enabling EVM tooling adds four more containers (Blockscout backend and frontend, plus their own Postgres and Redis), pushing idle memory to around 3.5 GB and adding ~1.6 GB of images. Give Docker headroom above these figures — usage grows with chain and indexing activity.
- (Optional)
jq: A command-line JSON processor. Useful for parsingcurlresponses from the REST API. Install it via your system's package manager (e.g.brew install jq,apt install jq). - (Optional)
curl: Command-line tool for making HTTP requests. Usually pre-installed on Linux/macOS. - (Optional, for EVM work) Ethereum tooling: Foundry (
forge,cast), Hardhat, or MetaMask, depending on your workflow.
3. Getting Started
3.1 Clone the repository
git clone https://github.com/PolymeshAssociation/polymesh-dev-env.git
cd polymesh-dev-env
3.2 Choose an environment preset
The envs/ directory holds presets that pin the Docker image versions and ports for each service:
| Preset | Chain image | Purpose |
|---|---|---|
envs/8.0 | polymesh:8.0.2-testnet-debian | Pinned chain v8 release. Recommended starting point — includes the optional EVM variables. |
envs/latest | polymesh:latest-testnet-debian | Floating latest tags for the newest builds. Used as the default by the helper scripts. |
envs/7.2 | polymesh-arm64:7.2.0-testnet-debian | Legacy non-EVM preset. Chain v7.2 has no pallet-revive, so EVM variables are omitted. |
envs/local | polymesh:8.0.2-testnet-debian | Like envs/8.0, but expects a locally built polymesh-rest-api:local image. |
envs/template | — | Full reference of every supported variable, including all optional EVM/Blockscout settings. Also linked as .env.example. |
3.3 Start the environment
The repository ships helper scripts that wrap docker compose and wait for initialisation to finish. This is the recommended way to start and stop the environment.
Default mode (no EVM tooling):
./scripts/start-env.sh --env-file envs/8.0
With EVM tooling (Ethereum JSON-RPC and Blockscout):
./scripts/start-env.sh --env-file envs/8.0 --profile evm
start-env.sh starts the services detached and then blocks until the environment-ready container reports the environment is fully initialised, so you can use it directly in scripts and CI.
Useful flags:
-
--env-file <path>— which preset to use. If omitted, both scripts default toenvs/latest. You can also set it via theCOMPOSE_ENVenvironment variable. -
--profile evm— start the optional EVM tooling services. Can also be set viaCOMPOSE_PROFILES. -
--pull [policy]— pull images before starting. A bare--pullmeansalways; any Docker Compose pull policy (always,missing,never,build) is accepted, or setCOMPOSE_PULL_POLICY. Recommended when using a preset with floating tags such asenvs/latest:./scripts/start-env.sh --env-file envs/latest --pull always
Using docker compose directly instead of the helper scripts
Copy your chosen preset to .env and run Compose yourself:
cp envs/8.0 .env
docker compose up -d                  # default mode
docker compose --profile evm up -d    # with EVM tooling
Alternatively, point Compose at the preset without copying it:
docker compose --env-file=envs/8.0 --profile evm up -d
Note that the EVM services are gated behind the evm Compose profile, so --profile evm must be repeated on every command that targets them, including down, logs, and ps. The helper scripts handle this for you.
The first time you run this, Docker downloads the necessary images, which may take several minutes depending on your connection. Subsequent starts are much faster.
3.4 Check environment status
start-env.sh already blocks until the environment is ready, so if you used it you can skip ahead. To watch the initialisation as it happens — or if you started the stack with plain Compose — the environment-ready service logs tell you when it's fully operational:
docker compose --env-file envs/8.0 logs -f environment-ready
docker compose command needs the env fileThe image names in compose.yaml come from variables in the env file, so any Compose command (logs, ps, down, …) fails with has neither an image nor a build context specified unless it can find them. Either pass --env-file envs/8.0 every time, or copy the preset once with cp envs/8.0 .env and drop the flag. The examples below assume you've done one or the other.
The environment performs several initialisation steps on the first run — Vault init and unseal, then on-chain account and identity creation. Wait for a message like this:
************************************************************************************
*** Polymesh Environment Ready! (Total initialization time: XXs)                 ***
************************************************************************************
First-time initialisation typically takes a few minutes — most of it waiting for the indexer to become healthy and for the on-chain identities to be created. Press Ctrl+C to exit the logs view. On subsequent starts (after a down that preserved volumes) readiness is reported almost immediately.
4. Endpoint Reference
Default host ports for every exposed service:
| Service | Endpoint | Port variable | Notes |
|---|---|---|---|
| Node (Substrate WebSocket) | ws://localhost:9944 | POLYMESH_CHAIN_WS_PORT | Use this for the SDK, polkadot.js, and the Polymesh Portal. |
| Node (Substrate HTTP RPC) | http://localhost:9933 | POLYMESH_CHAIN_RPC_PORT | Retained for legacy compatibility — see the note below. |
| Node (P2P) | localhost:30333 | POLYMESH_CHAIN_P2P_PORT | Not needed for normal development. |
| SubQuery GraphQL (middleware) | http://localhost:3000 | POLYMESH_SUBQUERY_GRAPHQL_PORT | GraphQL playground is enabled. |
| REST API — local signers | http://localhost:3004 | POLYMESH_REST_API_LOCAL_SM_PORT | Swagger/OpenAPI UI served at the root path. |
| REST API — Vault signers | http://localhost:3005 | POLYMESH_REST_API_VAULT_SM_PORT | Swagger/OpenAPI UI served at the root path. |
| HashiCorp Vault | http://localhost:8200 | VAULT_PORT | Vault UI is enabled at /ui. |
| Ethereum JSON-RPC | http://localhost:8545 | POLYMESH_ETH_RPC_PORT | --profile evm only. |
| Blockscout explorer UI | http://localhost:4000 | POLYMESH_BLOCKSCOUT_PORT | --profile evm only. |
| Blockscout backend API | http://localhost:4001 | POLYMESH_BLOCKSCOUT_BACKEND_PORT | --profile evm only. Health check: /api/v2/stats. |
Modern Substrate nodes serve HTTP and WebSocket RPC on a single port, and this node listens only on 9944. Compose maps host port 9933 to that same port so tooling and scripts that still assume the historical HTTP-RPC port keep working. Both host ports reach the same RPC server, and either accepts HTTP or WebSocket — there is nothing available on 9933 that isn't also on 9944. New code should just use 9944.
The Blockscout frontend is a browser app, so it calls the backend from the user's browser using NEXT_PUBLIC_API_PORT. Compose wires that to POLYMESH_BLOCKSCOUT_BACKEND_PORT, so if you change the backend port, the frontend follows automatically — but if you override the frontend variables yourself, keep the two aligned or the UI will fail to load data.
5. Understanding the Core Services
Here's a breakdown of each service defined in compose.yaml and its role.
-
polymesh-node:- Description: The core Polymesh blockchain node, using the image specified by
POLYMESH_CHAIN_IMAGE. - Why it's there: This is the actual blockchain where transactions are processed and blocks are produced. It runs with
--dev, which uses the development chain spec (pre-funding well-known accounts like Alice, Bob, and Charlie) and, combined with--alice --validator --force-authoring, produces blocks as a single authority. It also runs with--pruning=archive(so historical state stays available for the indexer),--rpc-cors=all,--rpc-methods=unsafe, and--unsafe-rpc-external— all appropriate for a throwaway local chain and never for a public node. - Ports: WebSocket (
9944), HTTP RPC (9933), and P2P (30333). - Data: Persists chain data in the
chain-datanamed volume.
- Description: The core Polymesh blockchain node, using the image specified by
-
postgres:- Description: A PostgreSQL 16.1 (Alpine) database instance.
- Why it's there: Required by the SubQuery indexer (
subquery-node) to store indexed blockchain data. It also hosts a smallservices_statusdatabase used by thevault-initandpolymesh-rest-api-vault-sm-initscripts to record their progress. Thepsql_extensions.sqlscript runs on initialisation to set up the database and required extensions. - Data: Persists data in the
psql-datanamed volume.
-
subquery-node:- Description: The Polymesh SubQuery indexer. It processes blocks from
polymesh-nodeand stores relevant data inpostgresaccording to a predefined schema. - Why it's there: Provides an efficient way to query historical blockchain data (transactions, events, balances, and so on) without hitting the node directly, which is much slower for complex lookups. The REST API and SDK rely on it for historical queries.
- Dependencies: Starts after
postgresandpolymesh-nodeare healthy.
- Description: The Polymesh SubQuery indexer. It processes blocks from
-
subquery-graphql:- Description: A GraphQL server exposing the data indexed by
subquery-node. - Why it's there: Offers a structured, powerful way to query indexed chain data. It is the "middleware" endpoint consumed by the Polymesh REST API, the SDK, and the Polymesh Portal.
- Ports: Exposes the GraphQL endpoint on port
3000(configurable viaPOLYMESH_SUBQUERY_GRAPHQL_PORT), with the playground enabled.
- Description: A GraphQL server exposing the data indexed by
-
vault:- Description: An instance of HashiCorp Vault, a tool for managing secrets and protecting sensitive data.
- Why it's there: Provides a secure way to manage the private keys used by one of the REST API instances (
polymesh-rest-api-vault-sm), mimicking a production setup where keys aren't hardcoded or stored insecurely. - Ports: Exposes the Vault API and UI on port
8200(configurable viaVAULT_PORT). - Data: Persists data in the
vault-volumenamed volume (logs invault-log-volume). Configured viascripts/vault-config.json.
-
vault-init:- Description: A run-once service that executes
vault-init-dependencies.sh(installingbash,jq, andpsqlinto its temporary container) and thenvault-init.sh. - Why it's there: Automates the Vault setup. On the first run it initialises Vault with a single unseal key and root token (saved to the
vault-root-tokenvolume as.unseal_keyand.token), unseals it, enables thetransitsecrets engine used for signing, and creates five ED25519 keys:admin,signer1,signer2,signer3, andsigner4. On subsequent runs it simply unseals Vault using the saved key. It records its status in theservices_statustable inpostgres. - Dependencies: Runs after
vaultstarts andpostgresis healthy. The Vault REST API waits for this service to complete successfully.
- Description: A run-once service that executes
-
polymesh-rest-api-vault-sm:- Description: An instance of the Polymesh REST API configured to use HashiCorp Vault as its Signing Manager (SM).
- Why it's there: Provides a standard HTTP API for interacting with the Polymesh node, using keys managed securely within Vault. The service automatically reads the
VAULT_TOKENfrom thevault-root-tokenvolume (created byvault-init). Signer identifiers for this API use the format{key_name}-{key_version}(e.g.admin-1,signer1-1). - Ports: Exposes the API on port
3005(configurable viaPOLYMESH_REST_API_VAULT_SM_PORT). - Dependencies: Starts after
polymesh-node,subquery-graphql, andvault-initare ready.
-
polymesh-rest-api-vault-sm-init:- Description: A run-once service that executes the
rest-api-accounts-init.shscript. - Why it's there: Automates the setup of on-chain accounts and identities corresponding to the keys created in Vault. It waits for
polymesh-rest-api-vault-smto be healthy, then uses that API to:- Look up the Polymesh addresses for
admin-1,signer1-1, …,signer4-1. - Call
/developer-testing/create-test-adminsto bootstrapadmin-1: the chain's sudo key prefunds it,admin-1registers its own DID withidentity::self_register_did, and sudo then tops it up to 20,000,000 POLYX. - Call
/developer-testing/create-test-accounts(signing asadmin-1) forsigner1-1, …,signer4-1:admin-1prefunds each account, each one then registers its own DID withidentity::self_register_did, andadmin-1funds it to 100,000 POLYX. - Save the resulting addresses and DIDs to files in the
rest-api-accounts-initvolume for persistence checks. - Create a
.setup-completefile in that volume to signal completion toenvironment-ready, and record its status in theservices_statustable.
- Look up the Polymesh addresses for
- Dependencies: Runs after
polymesh-rest-api-vault-smis healthy.
- Description: A run-once service that executes the
-
polymesh-rest-api-local-sm:- Description: A second, independent instance of the Polymesh REST API configured to use the Local Signing Manager.
- Why it's there: Provides an alternative REST API endpoint that uses well-known development keys (Alice, Bob, Charlie) defined by their mnemonics (
//Alice, and so on). This is simpler for basic tests or examples that rely on these known accounts, without involving Vault. - Ports: Exposes the API on port
3004(configurable viaPOLYMESH_REST_API_LOCAL_SM_PORT). - Dependencies: Starts after
polymesh-nodeandsubquery-graphqlare ready.
-
environment-ready:- Description: A lightweight container that waits for the
.setup-completefile to appear in therest-api-accounts-initvolume (created bypolymesh-rest-api-vault-sm-init). - Why it's there: Provides a clear signal in the Docker logs that all automated initialisation steps have finished and the environment is ready for use — especially important on the first launch.
start-env.shwaits on this container.
- Description: A lightweight container that waits for the
6. Understanding the EVM Tooling Services
These services only start when the evm Compose profile is enabled.
-
polymesh-eth-rpc:- Description: The
pallet-revive-eth-rpcproxy (image configurable viaPOLYMESH_ETH_RPC_IMAGE), which translates standard Ethereum JSON-RPC calls into Substrate calls againstpolymesh-node. - Why it's there:
pallet-reviveis a Substrate pallet, not a full Ethereum node, so it doesn't speak Ethereum JSON-RPC directly. This proxy lets MetaMask, Foundry, Hardhat, ethers.js, viem, and Blockscout target Polymesh unchanged. - Ports: Exposes JSON-RPC on port
8545(configurable viaPOLYMESH_ETH_RPC_PORT). It runs with--rpc-cors=alland--allow-unprotected-txsso legacy (non-EIP-155) transaction flows work for local experimentation. - Platform: Pinned to
linux/amd64by default (POLYMESH_ETH_RPC_PLATFORM); some upstream image tags are architecture-specific, so override this if you're on a different architecture.
- Description: The
-
polymesh-blockscout:- Description: The Blockscout explorer backend (indexer plus API), an Elixir/Phoenix application.
- Why it's there: Indexes the EVM view of the chain via
polymesh-eth-rpcand serves the explorer API — block, transaction, address, contract, and token data — used by the frontend and available directly for scripting. - Ports: Exposes the API on port
4001(configurable viaPOLYMESH_BLOCKSCOUT_BACKEND_PORT). - Configuration: Branded for Polymesh by default (
COIN/COIN_NAMEPOLYX,NETWORKPolymesh,SUBNETWORKPolymesh Dev) and pointed at the local EVM chain ID (POLYMESH_EVM_CHAIN_ID, default1641818). Market data and Blockscout accounts are disabled since they're meaningless locally.SECRET_KEY_BASEhas a throwaway default for local use — override it viaPOLYMESH_BLOCKSCOUT_SECRET_KEY_BASEfor anything shared. - Data: Persists logs and
detsfiles in theblockscout-logsandblockscout-detsvolumes.
-
polymesh-blockscout-frontend:- Description: The Blockscout web UI (a Next.js app).
- Why it's there: Gives you a familiar Etherscan-style browser interface over your local chain's EVM activity.
- Ports: Exposes the UI on port
4000(configurable viaPOLYMESH_BLOCKSCOUT_PORT). - Wallet interaction: The contract Write tab and MetaMask integration require a WalletConnect project ID. Set
POLYMESH_BLOCKSCOUT_WALLET_CONNECT_PROJECT_ID(get a free ID from cloud.reown.com) to enable in-browser wallet interaction. Read-only browsing works without it.
-
blockscout-dbandblockscout-redis:- Description: A dedicated PostgreSQL 17 instance and a Redis instance for Blockscout.
- Why they're there: Blockscout keeps its own datastore, deliberately separate from the SubQuery
postgresservice so the two indexers can't interfere with each other. Redis backs Blockscout's rate limiting and caching. - Data: Persist in the
blockscout-db-dataandblockscout-redis-datavolumes.
7. Choosing a Signing Manager (Local vs Vault)
This environment runs two REST API instances, allowing you to choose how keys are managed:
-
Local signers (
polymesh-rest-api-local-smon port3004):- Uses predefined development accounts (Alice, Bob, Charlie).
- Keys are derived from hardcoded mnemonics (
//Alice, and so on). - Simpler for basic testing or following SDK examples that use these accounts.
- Signer names are simple strings:
alice,bob,charlie.
-
Vault signers (
polymesh-rest-api-vault-smon port3005):- Uses keys securely stored and managed by HashiCorp Vault (
admin,signer1throughsigner4). - More closely mimics a production setup where keys are not exposed directly.
- Required for examples using the accounts automatically set up by
polymesh-rest-api-vault-sm-init, which are the only accounts provisioned with on-chain identities and POLYX. - Signer names follow the pattern
{key_name}-{key_version}:admin-1,signer1-1,signer2-1, and so on.
- Uses keys securely stored and managed by HashiCorp Vault (
You'll interact with one or the other depending on which accounts and keys you need. The following examples primarily use the Vault SM (localhost:3005) because those accounts are automatically provisioned with identities.
8. Interacting with the Environment
8.1 Browsing the REST API (OpenAPI/Swagger)
Both REST API instances serve their interactive OpenAPI UI at the root path, which is the fastest way to explore every available endpoint and payload shape:
- Vault signers:
http://localhost:3005 - Local signers:
http://localhost:3004
8.2 Connecting the Polymesh Portal
You can connect the Polymesh Portal to your local node for a visual interface:
- Run the portal web UI locally. You can get it here. Public portal instances are served over HTTPS, so browsers block them from connecting to an unsecured local WebSocket — running the portal locally avoids this mixed-content restriction.
- Navigate to Settings.
- Click the section displaying the current Node RPC URL and Middleware URL.
- Choose "Allow connecting to insecure local nodes" if prompted or required by your browser.
- Enter the following details:
- Node RPC URL:
ws://localhost:9944(or your customPOLYMESH_CHAIN_WS_PORT) - Middleware URL:
http://localhost:3000(or your customPOLYMESH_SUBQUERY_GRAPHQL_PORT)
- Node RPC URL:
- Save the settings. The portal should now reflect the state of your local chain.
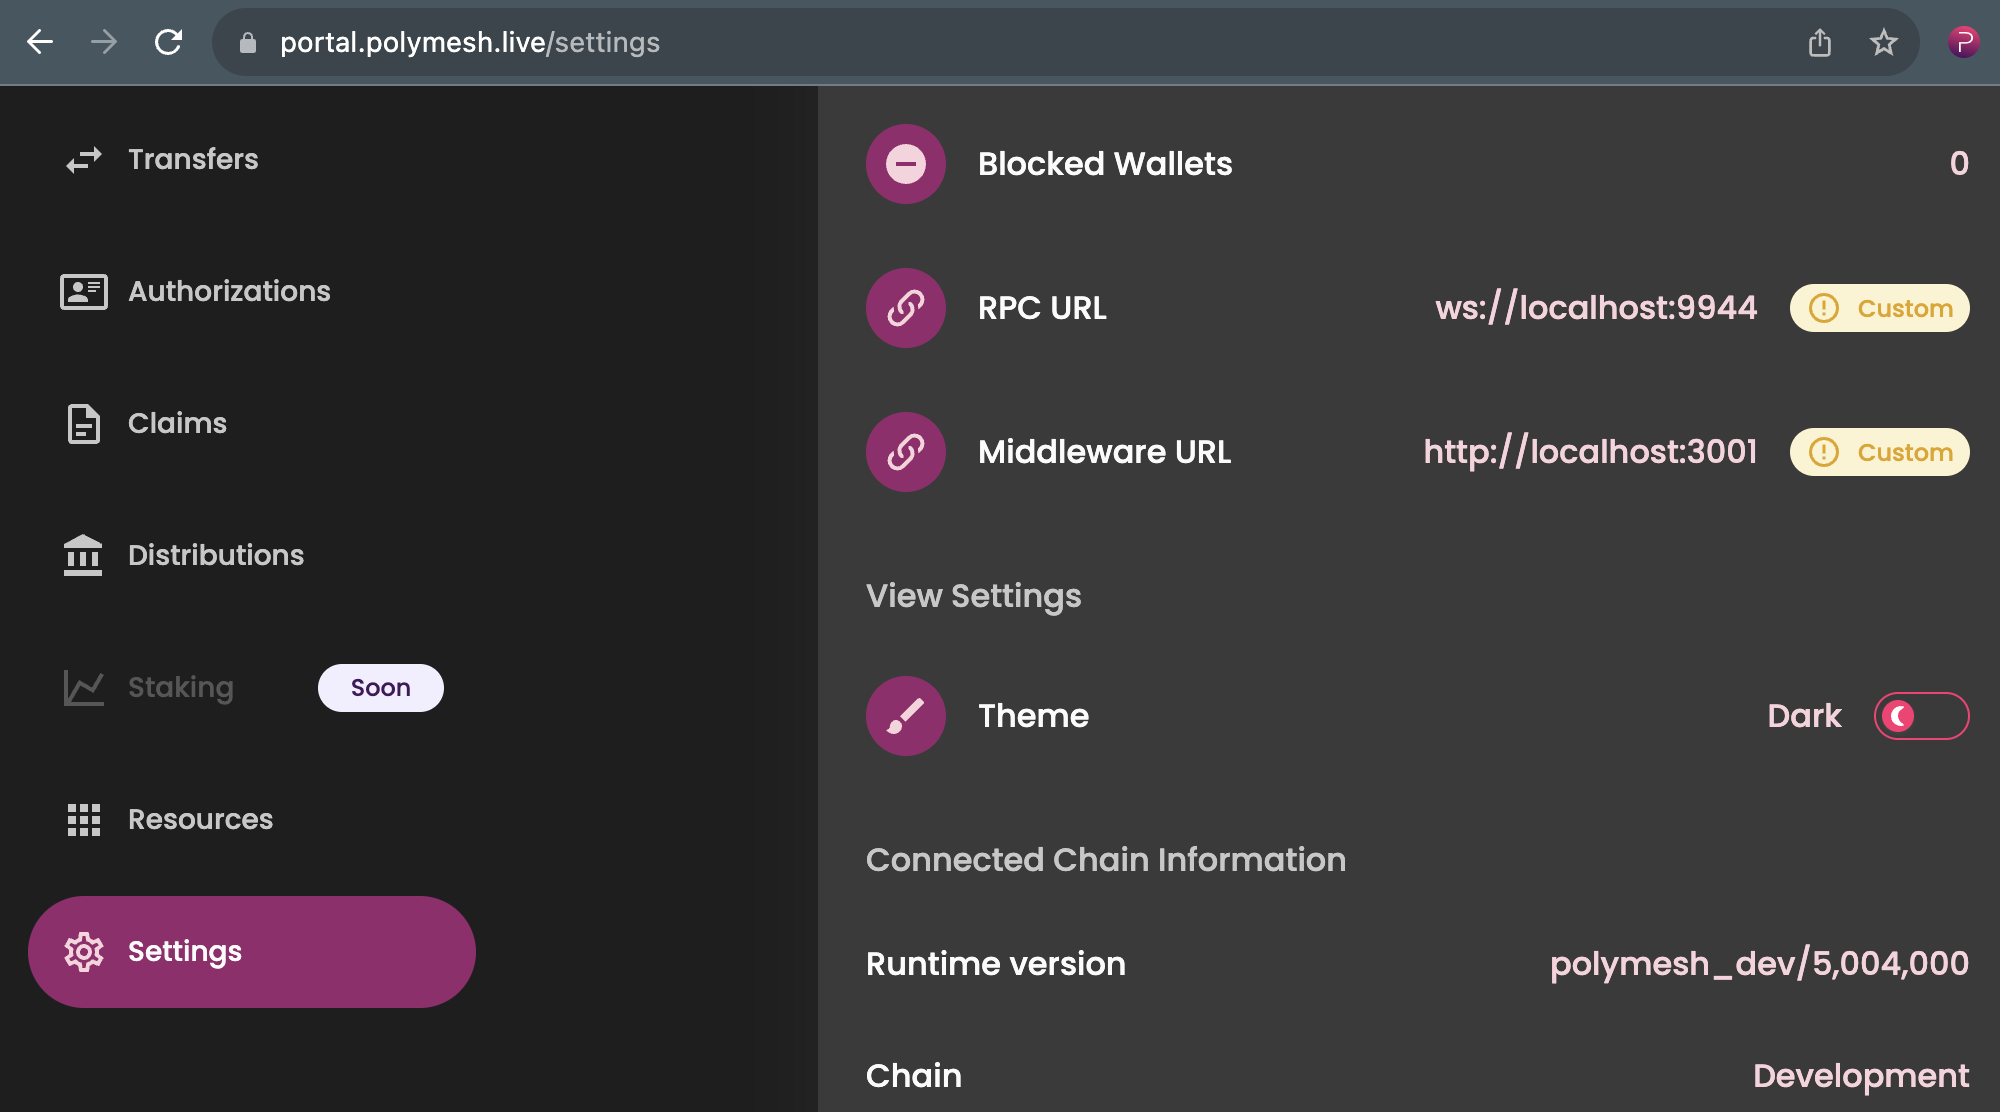
To interact with the portal, add one of the built-in accounts to your wallet. Use the following development mnemonics to restore with recovery phrase:
- bottom drive obey lake curtain smoke basket hold race lonely fit walk//Alice
- bottom drive obey lake curtain smoke basket hold race lonely fit walk//Bob
- bottom drive obey lake curtain smoke basket hold race lonely fit walk//Charlie
and so on.
8.3 Using the REST APIs with curl
You can interact with the REST APIs directly using curl or any HTTP client. Remember to target the correct port (3004 for local SM, 3005 for Vault SM).
Example: Get Alice's address (local SM)
curl -s http://localhost:3004/signer/alice | jq
Expected output:
{
  "address": "5GrwvaEF5zXb26Fz9rcQpDWS57CtERHpNehXCPcNoHGKutQY"
}
Example: Get Signer1's address (Vault SM)
The rest-api-accounts-init.sh script already did this and stored the result, but you can verify:
curl -s http://localhost:3005/signer/signer1-1 | jq
Expected output — Vault generates fresh keys, so this address is different every time the environment is reset with its volumes removed:
{
  "address": "5GKXbBc6Ha9YqgRAMH4NsAc1VGc7fb5mE34eD6Xtw6MNfJc6"
}
The addresses and DIDs created during initialisation are also printed in the init service logs:
docker compose logs polymesh-rest-api-vault-sm-init
Example: Get Signer1's balance (Vault SM)
SIGNER1_ADDRESS=$(curl -s http://localhost:3005/signer/signer1-1 | jq -r .address)
echo "Signer1 Address: $SIGNER1_ADDRESS"

# Now get the balance
curl -s "http://localhost:3005/accounts/${SIGNER1_ADDRESS}/balance" | jq
Expected output, reflecting the initial funding:
{
  "total": "100000",
  "locked": "0",
  "free": "100000"
}
8.4 Example: Transfer POLYX (Vault SM)
Let's transfer 50 POLYX from signer1-1 to signer2-1.
-
Get the addresses:
SIGNER1_ADDRESS=$(curl -s http://localhost:3005/signer/signer1-1 | jq -r .address)SIGNER2_ADDRESS=$(curl -s http://localhost:3005/signer/signer2-1 | jq -r .address)echo "Signer1 Address: $SIGNER1_ADDRESS"echo "Signer2 Address: $SIGNER2_ADDRESS" -
Prepare the transfer payload. Supplying a
memomakes this abalances.transferWithMemoextrinsic; thesignerfield identifies the Vault key that signs the request and pays the fee.AMOUNT="50"JSON_PAYLOAD=$(cat <<EOF{"options": {"signer": "signer1-1","processMode": "submit"},"to": "$SIGNER2_ADDRESS","amount": "$AMOUNT","memo": "Sample transfer"}EOF)echo "Payload:"echo $JSON_PAYLOAD | jq -
Submit the transaction:
curl -s -X POST \http://localhost:3005/accounts/transfer \-H 'Content-Type: application/json' \-d "$JSON_PAYLOAD" | jqThe response includes the block and transaction hashes, the
transactionTag(balances.transferWithMemo), and a fee breakdown. -
Check the balances (optional).
signer1-1's balance drops by 50 POLYX plus transaction fees, andsigner2-1's rises by exactly 50 POLYX.curl -s "http://localhost:3005/accounts/${SIGNER1_ADDRESS}/balance" | jq .freecurl -s "http://localhost:3005/accounts/${SIGNER2_ADDRESS}/balance" | jq .free
8.5 Example: Create an Asset (Vault SM)
Let's create a new asset named "My Dev Token" using the signer3-1 account.
An asset's canonical identifier is a UUID asset ID assigned on creation. A ticker is an optional, separately-registered label that can be linked to (and unlinked from) an asset — see Ticker Registration. REST endpoints that take an asset accept either form, but the asset ID is the one to build against.
-
Prepare the asset creation payload. The fields are:
name: the asset's full name.assetType:EquityCommon,EquityPreferred,Commodity, and so on. We'll useEquityCommon.isDivisible: whether the token can be held in fractional amounts.initialSupply(optional): tokens minted at creation, assigned to the creator's default portfolio.ticker(optional): a short uppercase symbol, max 12 characters. It must be free or already reserved by the signer; supplying it here reserves and links it in the same batch.securityIdentifiers(optional): globally recognised codes identifying financial instruments —Cusip(North American securities),Cins(international CUSIP extension),Isin(global standard),Lei(legal entity identifier), andFigi(global financial instrument identifier).fundingRound(optional): label indicating the financing stage (e.g. "Seed", "Series A").documents(optional): documents associated with the asset, such as legal disclosures and prospectuses, with their metadata.
JSON_PAYLOAD=$(cat <<EOF{"options": {"signer": "signer3-1","processMode": "submit"},"name": "My Dev Token","initialSupply": "627880","isDivisible": true,"assetType": "EquityCommon","securityIdentifiers": [{"type": "Isin","value": "US0846707026"}],"fundingRound": "Series A","documents": [{"name": "Annual report, 2021","uri": "https://example.com/sec/10k-05-23-2021.htm","contentHash": "0xaaaaaaaaaaaaaaaaaaaaaaaaaaaaaaaaaaaaaaaaaaaaaaaaaaaaaaaaaaaaaaaaaaaaaaaaaaaaaaaaaaaaaaaaaaaaaaaaaaaaaaaaaaaaaaaaaaaaaaaaaaaaaaaa","type": "Private Placement Memorandum","filedAt": "2025-04-09T00:00:00.000Z"}]}EOF)echo "Payload:"echo $JSON_PAYLOAD | jq -
Submit the transaction and capture the asset ID:
RESPONSE=$(curl -s -X POST \http://localhost:3005/assets/create \-H 'Content-Type: application/json' \-d "$JSON_PAYLOAD")echo $RESPONSE | jqASSET_ID=$(echo $RESPONSE | jq -r .asset)echo "Asset ID: $ASSET_ID"The
assetfield of the response holds the new asset's ID, for example:{ "asset": "d7dbc7c8-9792-8070-9565-322d6281f4d4" } -
Verify the asset (optional):
curl -s "http://localhost:3005/assets/${ASSET_ID}" | jq{"owner": "0x1e7e33e6636cbeb87a8809c2be7f5e0e0701bfd51931010859fdde31a0f1a918","assetId": "d7dbc7c8-9792-8070-9565-322d6281f4d4","assetType": "EquityCommon","name": "My Dev Token","totalSupply": "627880","isDivisible": true,"securityIdentifiers": [{ "type": "Isin", "value": "US0846707026" }],"fundingRound": "Series A","isFrozen": false,"agents": ["0x1e7e33e6636cbeb87a8809c2be7f5e0e0701bfd51931010859fdde31a0f1a918"]}If you included a
tickerin the payload, the same asset is also retrievable by that ticker —GET /assets/MYDEVreturns the identical record.
8.6 Querying the indexer with GraphQL
The SubQuery GraphQL endpoint serves indexed historical data and ships with a playground you can open in a browser at http://localhost:3000. It's also queryable directly:
curl -s -X POST http://localhost:3000/ \
  -H 'Content-Type: application/json' \
  -d '{"query":"{ blocks(first: 1, orderBy: BLOCK_ID_DESC) { nodes { blockId hash } } }"}' | jq
See the SubQuery Indexer page for the wider schema.
8.7 Using Vault directly
The Vault UI is available at http://localhost:8200. To log in, or to use the Polymesh SDK's Vault signing manager from your host machine, you need the root token. It is printed by vault-init during setup and there's a helper script to extract it:
./scripts/get-vault-token.sh
# or
docker compose logs vault-init | grep 'Vault Root Token'
For anything beyond local experimentation, create a scoped token via the Vault UI or CLI rather than reusing the root token.
9. EVM Development
With --profile evm enabled, the environment exposes a standard Ethereum JSON-RPC endpoint and a Blockscout explorer over your local chain. pallet-revive executes solc-compiled Solidity in a bundled EVM (revm) with full EVM compatibility, so ordinary Ethereum tooling works unmodified.
9.1 Network parameters
Use these values for MetaMask, Hardhat, Foundry, ethers.js, or viem:
| Setting | Local value |
|---|---|
| Network name | Polymesh Dev |
| RPC URL | http://127.0.0.1:8545 |
| Chain ID | 1641818 |
| Currency symbol | POLYX |
| Currency decimals | 18 |
| Block explorer | http://127.0.0.1:4000 |
Polymesh's EVM chain IDs across networks:
| Network | EVM chain ID | Public RPC URL |
|---|---|---|
| Local develop runtime | 1641818 | http://localhost:8545 |
| Testnet (v8) | 1641819 | https://testnet-evm-rpc.polymesh.live |
| Mainnet (v8) | 1641820 | https://mainnet-evm-rpc.polymesh.network |
The runtime's NativeToEthRatio of 1012 scales Polymesh's 6-decimal POLYX up to the 18-decimal wei convention Ethereum tooling expects. So a balance of 1 POLYX appears as 1000000000000000000 over JSON-RPC. Configure wallets with 18 decimals.
9.2 Smoke checks
Two scripts verify the EVM services are working:
./scripts/evm-smoke-test.sh
./scripts/blockscout-smoke-test.sh
evm-smoke-test.sh checks eth_chainId (asserting it matches POLYMESH_EVM_CHAIN_ID), eth_getBalance, and eth_getLogs:
[EVM SMOKE] Using RPC endpoint: http://127.0.0.1:8545
[EVM SMOKE] Expecting chain id: 0x190d5a
[EVM SMOKE] eth_chainId OK: 0x190d5a
[EVM SMOKE] eth_getBalance OK: 0x18d0bf423c02f0095af000
[EVM SMOKE] eth_getLogs OK
[EVM SMOKE] All checks passed
blockscout-smoke-test.sh confirms the explorer backend answers with a valid payload on /api/v2/stats.
You can also query the endpoint by hand:
curl -s -H 'Content-Type: application/json' \
  -d '{"jsonrpc":"2.0","method":"eth_chainId","params":[],"id":1}' \
  http://127.0.0.1:8545 | jq
9.3 The pre-funded development accounts
The --dev chain spec pre-funds five well-known Ethereum-style accounts, immediately usable from Ethereum tooling — no map_account call needed, since they're funded directly at genesis to their 0xEE-padded fallback account:
| Name | Address | Private key |
|---|---|---|
| Alith | 0xf24FF3a9CF04c71Dbc94D0b566f7A27B94566cac | 0x5fb92d6e98884f76de468fa3f6278f8807c48bebc13595d45af5bdc4da702133 |
| Baltathar | 0x3Cd0A705a2DC65e5b1E1205896BaA2be8A07c6e0 | 0x8075991ce870b93a8870eca0c0f91913d12f47948ca0fd25b49c6fa7cdbeee8b |
| Charleth | 0x798d4Ba9baf0064Ec19eB4F0a1a45785ae9D6DFc | 0x0b6e18cafb6ed99687ec547bd28139cafdd2bffe70e6b688025de6b445aa5c5b |
| Dorothy | 0x773539d4Ac0e786233D90A233654ccEE26a613D9 | 0x39539ab1876910bbf3a223d84a29e28f1cb4e2e456503e7e91ed39b2e7223d68 |
| Ethan | 0xFf64d3F6efE2317EE2807d223a0Bdc4c0c49dfDB | 0x7dce9bc8babb68fec1409be38c8e1a52650206a7ed90ff956ae8a6d15eeaaef4 |
These are the same well-known Ethereum dev accounts — named to loosely pair with Alice, Bob, Charlie, Dave, and Eve, but each is an independent secp256k1 keypair.
They are well-known development keys published across Substrate/Frontier-ecosystem documentation. Anyone can spend from them. Use them only on throwaway local chains.
To use your own Polymesh account from the EVM side instead, that account must first call map_account on pallet-revive. Until it does, funds sent to its derived Ethereum-style address land in a distinct 0xEE-padded fallback account. Read Address mapping before doing this — it's the most common source of "missing" funds in EVM work on Polymesh.
9.4 Deploying a contract
Any standard Solidity toolchain works. Using Foundry:
forge init counter && cd counter
Write a minimal contract at src/Counter.sol:
// SPDX-License-Identifier: MIT
pragma solidity ^0.8.20;

contract Counter {
    uint256 public number;

    function increment() public {
        number++;
    }
}
Deploy and interact with it against the local endpoint:
export ETH_RPC_URL=http://127.0.0.1:8545
export DEV_KEY=0x5fb92d6e98884f76de468fa3f6278f8807c48bebc13595d45af5bdc4da702133

forge create --rpc-url $ETH_RPC_URL --private-key $DEV_KEY --broadcast src/Counter.sol:Counter
# Deployed to: 0x...

CONTRACT=0x...   # address from the output above

cast call --rpc-url $ETH_RPC_URL $CONTRACT 'number()(uint256)'
cast send --rpc-url $ETH_RPC_URL --private-key $DEV_KEY $CONTRACT 'increment()'
cast call --rpc-url $ETH_RPC_URL $CONTRACT 'number()(uint256)'
Both EIP-1559 and legacy (type-0) transactions are accepted, the latter because eth-rpc runs with --allow-unprotected-txs.
For Hardhat, add a network pointing at the same values:
networks: {
  polymeshDev: {
    url: 'http://127.0.0.1:8545',
    chainId: 1641818,
    accounts: ['0x5fb92d6e98884f76de468fa3f6278f8807c48bebc13595d45af5bdc4da702133'],
  },
}
9.5 Using the Blockscout explorer
Open http://localhost:4000 to browse blocks, transactions, addresses, and contracts. The explorer is branded for Polymesh and denominated in POLYX out of the box:
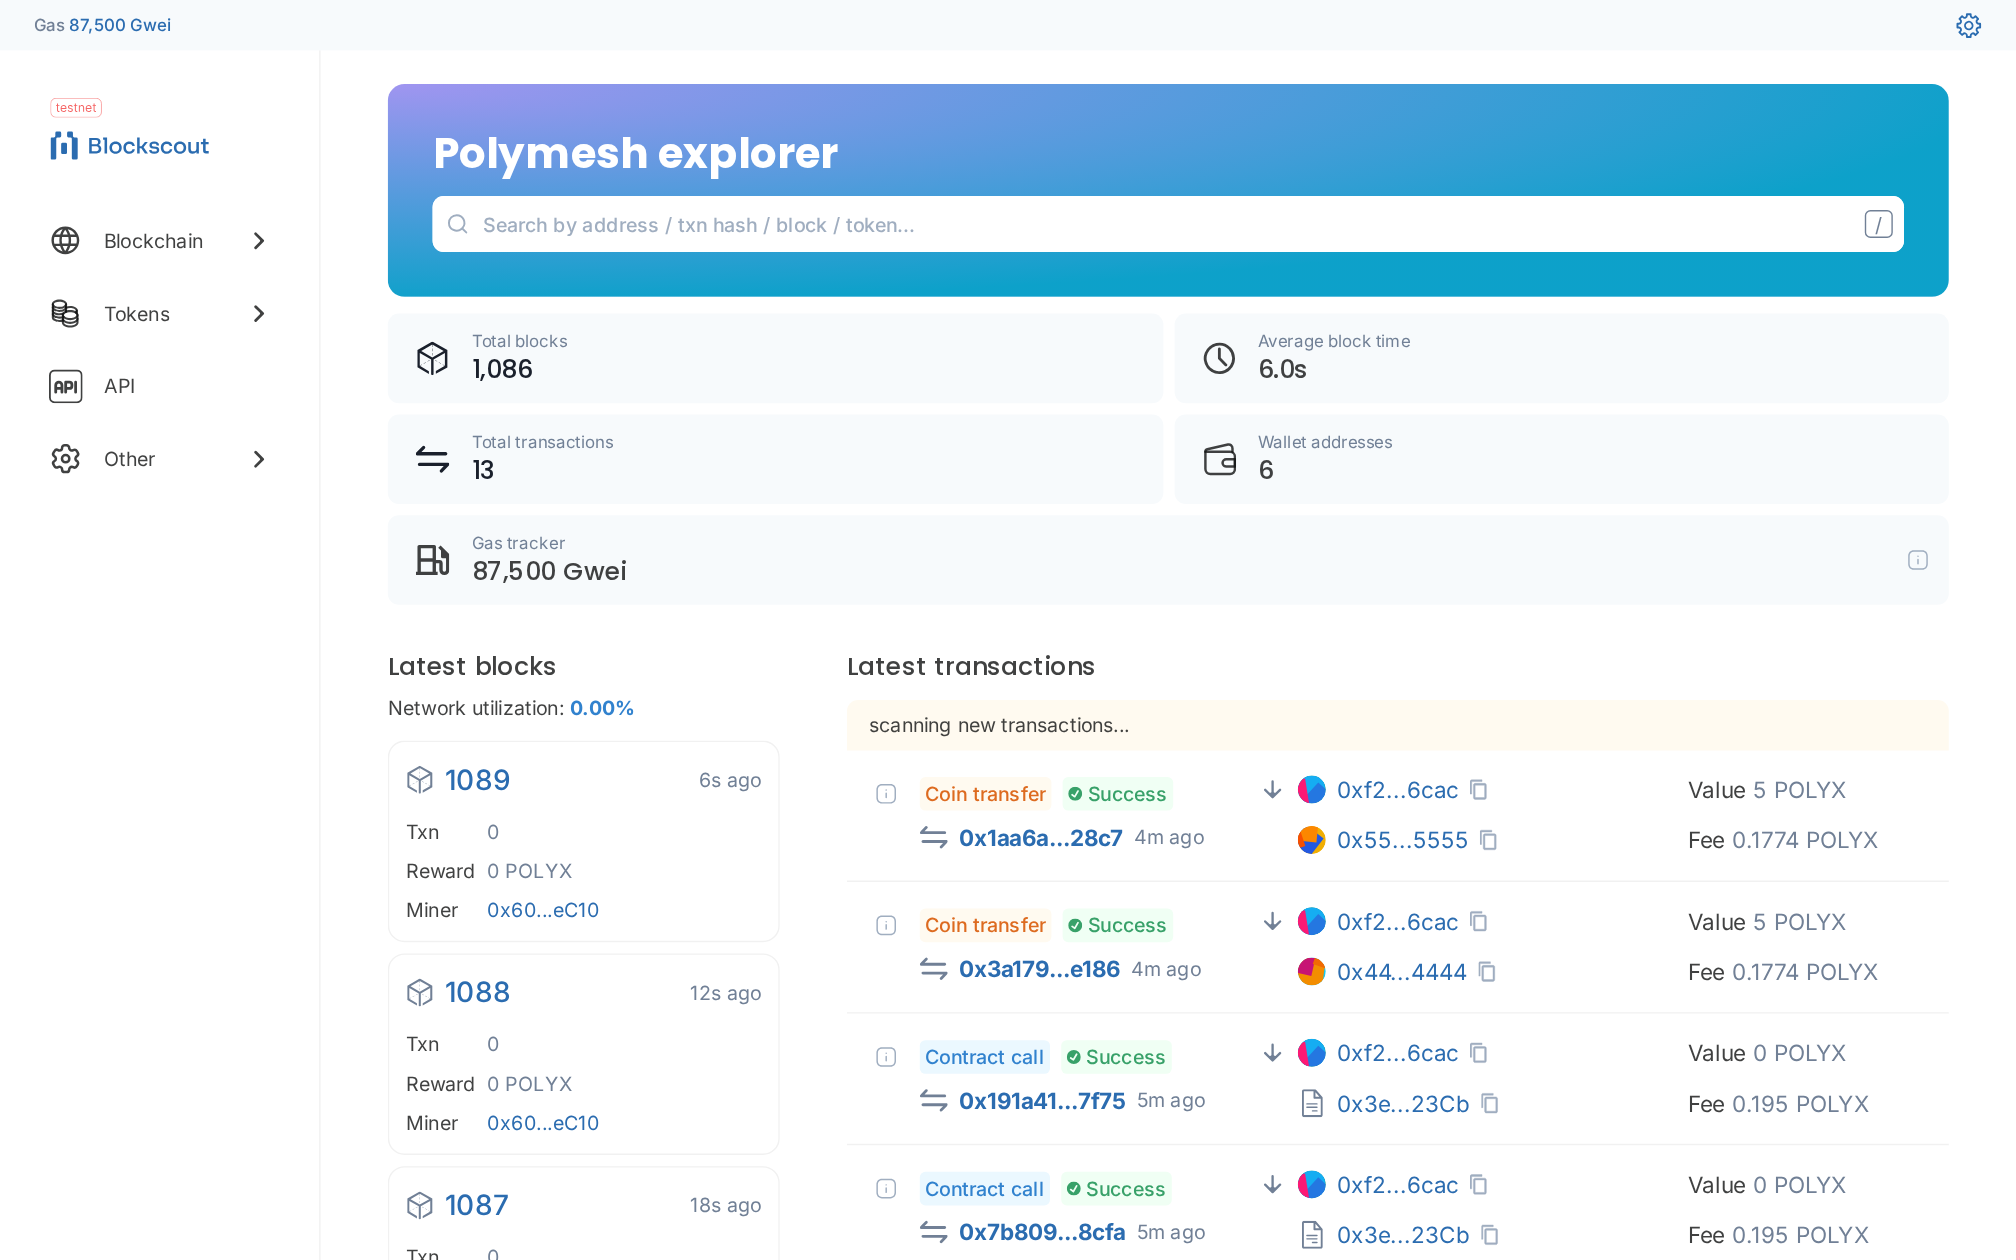
The transaction list shows the EVM activity on your local chain, with each transaction classified by type — plain POLYX transfers, contract calls, and token transfers:
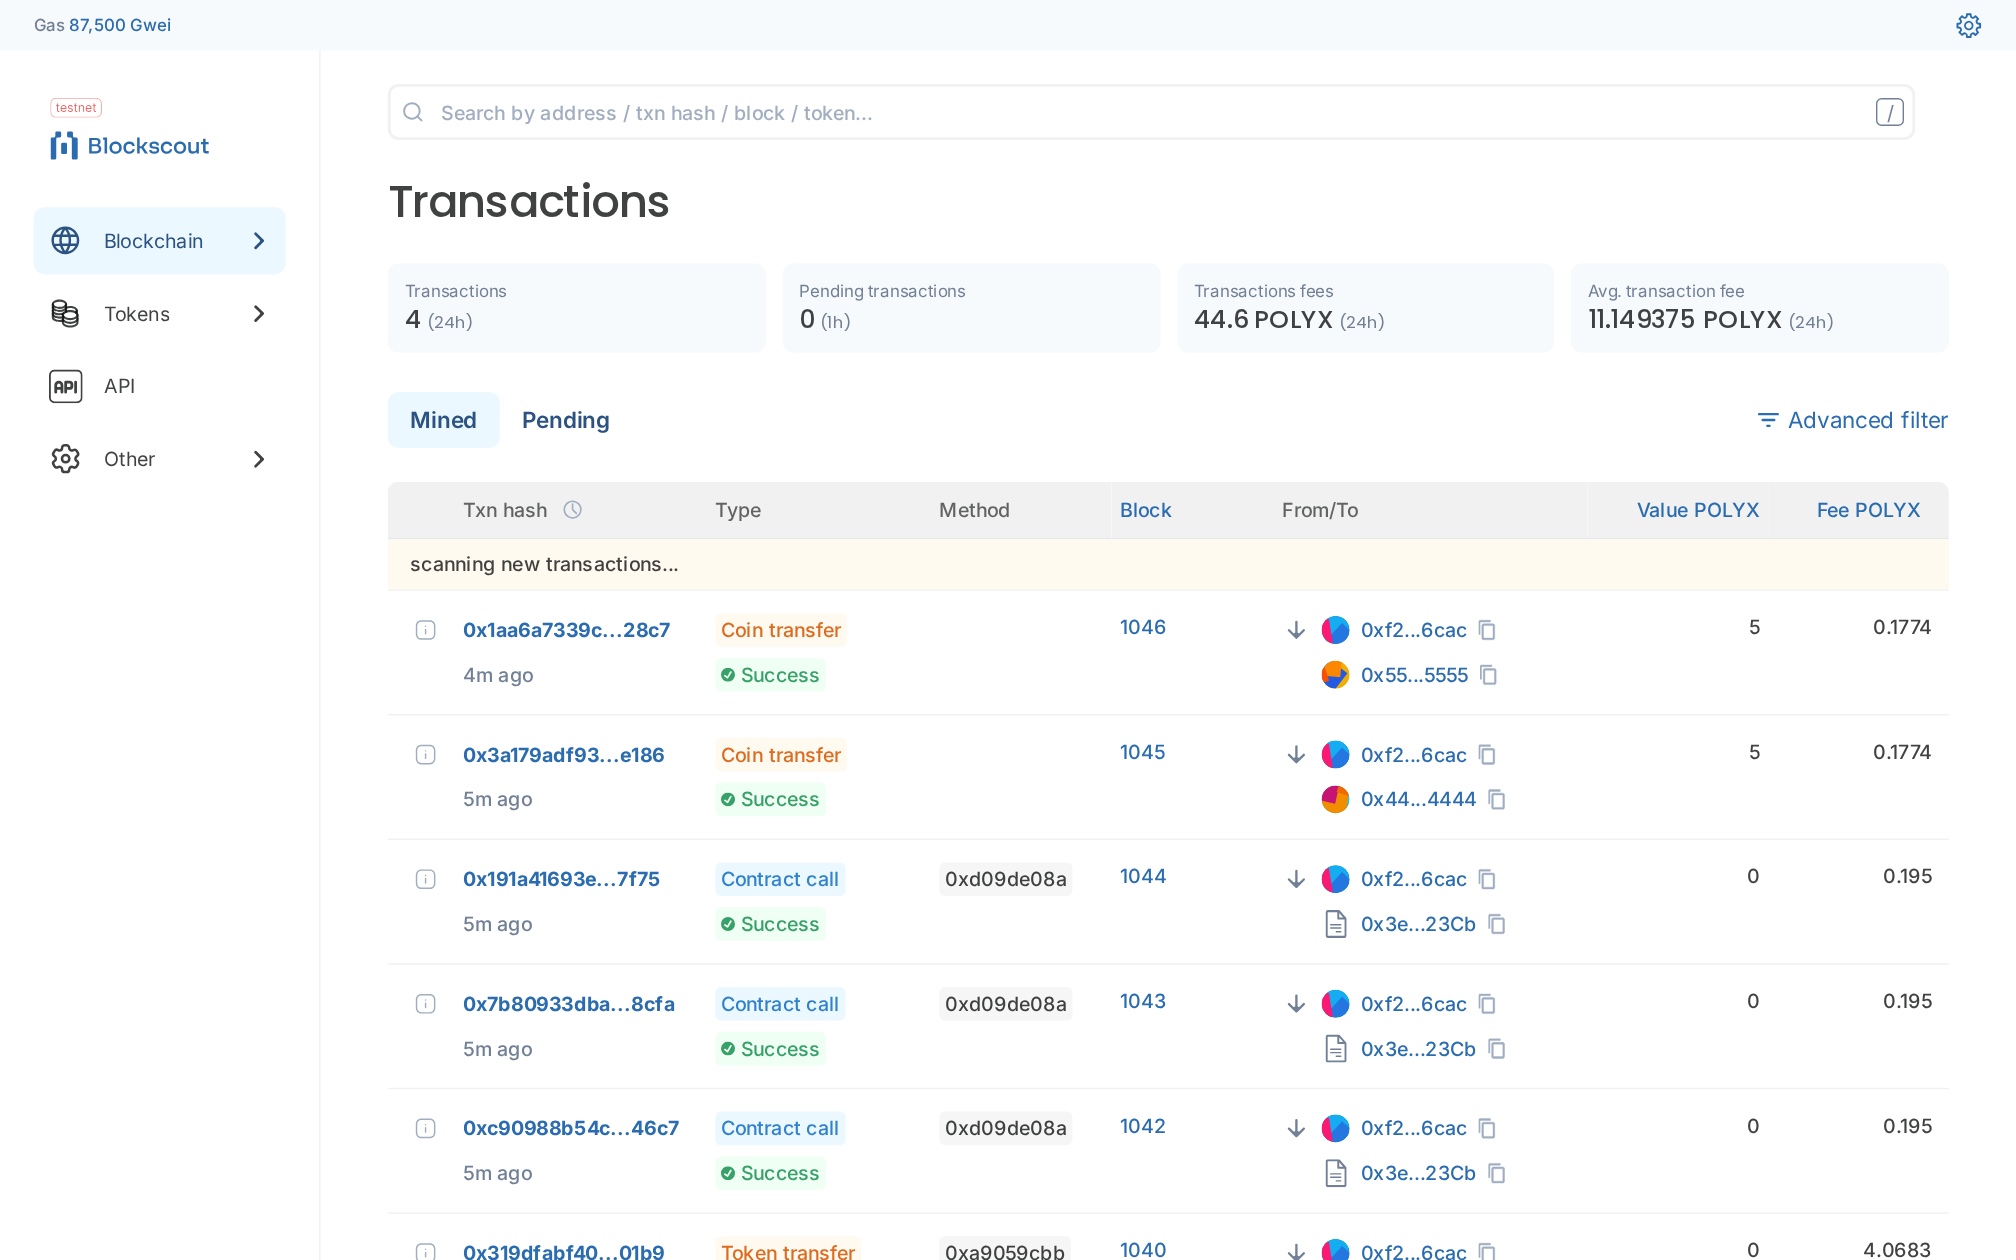
The backend API is directly usable too:
# Overall chain statistics
curl -s http://127.0.0.1:4001/api/v2/stats | jq

# Look up a deployed contract
curl -s "http://127.0.0.1:4001/api/v2/addresses/${CONTRACT}" | jq '{hash, is_contract}'
Blockscout indexes transactions submitted through the Ethereum JSON-RPC path. Native Substrate extrinsics — POLYX transfers via the REST API, asset creation, settlement, and everything else on the native layer — do not appear as transactions in Blockscout, even though their blocks do. For the native view, use the SubQuery GraphQL endpoint or the Polymesh Portal.
Enabling the contract Write tab and MetaMask interaction in the Blockscout UI requires a WalletConnect project ID. Get a free one from cloud.reown.com and set it in your env file:
POLYMESH_BLOCKSCOUT_WALLET_CONNECT_PROJECT_ID=your_project_id
9.6 EVM notes and caveats
- JSON-RPC method and subscription coverage varies by
eth-rpcimage tag. KeepPOLYMESH_ETH_RPC_IMAGEpinned to a known-good tag rather than a floating one. - Some upstream
parityprtags are architecture-specific; overridePOLYMESH_ETH_RPC_PLATFORMif the defaultlinux/amd64doesn't suit your machine. - Blockscout backend startup takes noticeably longer than the rest of the stack (it runs database migrations on first boot), so give it a minute after
environment-readyreports success before expecting the UI to load. - Polymesh's
pallet-reviveis the same upstream pallet used across the Polkadot ecosystem, so Polkadot's smart contracts documentation is a good reference for general EVM tooling — including its JSON-RPC API guide for Ethereum developers. Treat Polymesh-specific runtime settings (chain IDs, precompiles, address mapping) as documented in Smart Contracts.
10. Stopping and Cleaning Up
The stop-env.sh helper always tears down the EVM services as well, so you never need to repeat --profile evm when stopping.
stop-env.sh removes your data by defaultUnlike a plain docker compose down, stop-env.sh removes the named volumes (chain data, indexed data, Vault keys and accounts, Blockscout database) unless you pass --keep-volumes.
Stop and reset to a clean state (the default):
./scripts/stop-env.sh --env-file envs/8.0
Stop but keep the data for the next start:
./scripts/stop-env.sh --env-file envs/8.0 --keep-volumes
Equivalent docker compose commands
Stop the containers without deleting data:
docker compose --profile evm down
Stop the containers and remove all associated volumes, resetting the environment:
docker compose --profile evm down --volumes
Caution: this deletes all blockchain history, indexed data, Vault keys, and any accounts and assets created inside the Docker environment.
To apply a change to your env file, restart the environment: stop it (with --keep-volumes if you want to retain state), then start it again.